Drywall cracks are a common issue in many homes. Over time, they can appear due to house settling, humidity changes, or simple wear and tear. While they may seem intimidating to repair, fixing drywall cracks is something anyone can learn to do with a little guidance. In this article, we will walk you through 10 essential tips to repair cracks in drywall. Whether you’re a beginner or an experienced DIYer, these steps will make the process simple and manageable for everyone, from kids to adults. Let’s dive in!
How to Repair a Crack
Step 1
Use 100-grit sandpaper to remove any loose debris from the cracked area.
If the cracks are narrower than ¼”, use a 5-in-1 painter’s tool to widen them slightly. This helps remove old caulking, paint, and debris, allowing the patching material to bond better.
Step 2
Sand any raised or rough areas lightly with 100-grit sandpaper. Wipe away dust or debris with a rag dampened with water.
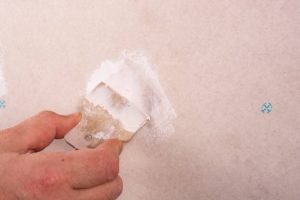
Step 3
Apply a thin layer of patching material to the crack using a putty knife. Let it dry.
To ensure a smooth finish, spread the patching material 1″-2″ beyond the crack, blending it into the surrounding area.
Step 4
Once the patch is dry, use 220-grit sandpaper to smooth it and make it even with the surrounding surface.
If the patch shrinks, lightly sand it, clean the area, and apply additional layers of patching material as needed.
Step 5
Clean off any remaining dust or debris from the repair.
If you need to retexture the surface, choose a finish that matches the existing texture. Textured ceiling or wall patch kits are available in aerosol or powder form—follow the manufacturer’s instructions for application.
Read the 10 essential tips for how to repair cracks in drywall
1. Identify the Type of Crack
Before jumping into repair work, it’s important to understand the type of crack you are dealing with. Drywall cracks generally come in different sizes and shapes, from hairline cracks to more severe ones. Hairline cracks are often thin and shallow, while larger cracks may indicate deeper structural issues. Identifying the crack helps you choose the right materials and tools for the job.
- Small Hairline Cracks: These are often due to normal house settling.
- Wide Cracks: These can be caused by more significant shifts in your home’s structure or moisture problems.
Knowing the crack’s type will determine the next steps for repair.
2. Gather the Right Tools and Materials
To effectively repair drywall cracks, you’ll need the proper tools. Here’s a list of essential items:
- Drywall compound (spackle or joint compound): This is a paste that fills the crack.
- Putty knife: A tool used to spread the compound smoothly.
- Sandpaper: Helps smooth the surface after applying the compound.
- Drywall tape: Reinforces the crack, preventing it from reopening.
- Utility knife: Used to widen cracks for a better fill, if necessary.
- Primer and paint: For the finishing touch to match your wall’s color.
Having everything on hand ensures that the repair process goes smoothly without any interruptions.
3. Prepare the Area
Before repairing the crack, it’s important to clean and prepare the area. This step ensures the repair will last and look seamless.
- Clean the Crack: Use a cloth to wipe away dust and debris from the crack. This will help the compound stick better.
- Widen the Crack (if necessary): If the crack is too narrow, use a utility knife to gently widen it. This allows the compound to fill the crack properly.
Once the area is clean and prepped, you’re ready to start filling the crack.
4. Apply Drywall Tape for Large Cracks
For larger cracks, drywall tape is essential. The tape strengthens the repair and prevents the crack from reopening. Here’s how to apply it:
- Cut the Tape: Cut a strip of drywall tape long enough to cover the entire crack.
- Apply the Tape: Press the tape firmly over the crack, making sure it’s flat and smooth.
After the tape is applied, you’ll use the drywall compound to secure it in place.
5. Fill the Crack with Drywall Compound
Now it’s time to apply the drywall compound. This step can be done whether you’re using tape or not (tape is recommended for larger cracks).
- Use the Putty Knife: Scoop a small amount of drywall compound onto your putty knife.
- Fill the Crack: Spread the compound over the crack, pressing it into the space and smoothing it over the surface.
- Apply in Thin Layers: For best results, apply two or three thin layers of compound, letting each layer dry before adding the next.
This step is important for creating a smooth, even surface that blends with the rest of the wall.
6. Let the Compound Dry
Patience is key during this step. Let the drywall compound dry completely before moving on to the next stage.
- Drying Time: Depending on the size of the crack and the thickness of the compound, drying time can range from a few hours to overnight.
Rushing this step can lead to uneven surfaces, so it’s best to give it plenty of time to dry thoroughly.
7. Sand the Area Smooth
Once the compound is fully dry, the next step is to sand it down. This will create a smooth surface that blends seamlessly with the wall.
- Use Fine Sandpaper: A fine-grit sandpaper (around 120 to 150 grit) works best for smoothing the compound.
- Sand Gently: Be careful not to sand too much. You just want to even out the surface without damaging the surrounding drywall.
After sanding, you should have a perfectly smooth area ready for painting.
8. Prime the Repaired Area
Before painting, it’s essential to prime the repaired area. This step ensures that the paint will adhere properly and blend with the rest of the wall.
- Use a Quality Primer: Apply a thin coat of primer to the repaired area using a brush or roller.
- Let It Dry: Make sure the primer is completely dry before moving on to the painting step.
Priming helps prevent the repaired area from standing out once the paint is applied.
9. Paint the Area to Match the Wall
Now that the primer is dry, it’s time for the finishing touch: painting. This step will make your wall look brand new.
- Match the Paint Color: Use the same paint color as the rest of the wall to ensure the repaired area blends in seamlessly.
- Apply Multiple Coats: Depending on the type of paint and the wall’s texture, you may need two or more coats. Allow each coat to dry before applying the next.
Once the paint is dry, your wall will look flawless, as if the crack never existed.
10. Prevent Future Cracks
After going through the trouble of repairing a drywall crack, it’s natural to want to avoid the issue from happening again. While cracks can be inevitable due to house settling, there are steps you can take to minimize the risk of future cracks.
- Control Humidity: High humidity levels can cause drywall to expand and contract, leading to cracks. Using a dehumidifier can help prevent this.
- Inspect for Structural Issues: If cracks keep appearing, there may be an underlying structural issue with your home. Consulting a professional can help you identify and fix this problem.
By maintaining your home properly, you can reduce the chances of new cracks forming in the future.
Conclusion
Repairing cracks in drywall is an assignment all of us can learn, no matter revel in. By following these 10 vital hints, you’ll be able to fix cracks successfully and correctly. From figuring out the type of crack to making use of the very last coat of paint, every step is designed that help you obtain professional-looking results. Whether you’re a homeowner or a renter, mastering to restore drywall cracks will save time and money, and supply your area a sparkling, polished appearance. Keep this guide handy the subsequent time you see a crack in your walls, and revel in the pleasure of a process nicely done!
At Eagleriver Painters, we understand the importance of maintaining a flawless home. If you need professional help with drywall repair or any other home improvement project, our team of experts is here to assist you. Let us handle the work so you can enjoy your beautiful home without the stress of DIY repairs. We are happy to help people in Eagle River and nearby areas with great painting, electrical, plumbing, and drywall work.